Asphalt pavement needs to be properly maintained in order to maintain its appearance. One essential maintenance service is sealcoating.
Sealcoat is a bituminous or acrylic liquid that replenishes oils and forms a protective layer on asphalt surfaces. It protects against water penetration, UV rays, chemicals, and traffic abrasion. It also enhances the appearance of asphalt, making it look new. Visit Website to learn more.
Seal Coating is a valuable maintenance procedure that protects asphalt driveways, parking lots and roads from the damaging effects of weather and natural wear. It can save you money by preventing costly repairs and extends the life of your pavement.
During the prep process, workers thoroughly clean the surface of your asphalt pavement. This includes removing any oil, gasoline or other petroleum-based fluids that have stained the pavement. They also remove any loose material that is sticking out from cracks and other damage to the surface. This will ensure that the new seal coat adheres properly and covers all areas of your pavement.
Once the area is completely clear, it’s time to mix the sealer. This is done with a spray hose that can create a thick coating of asphalt sealer on the pavement. This is the fastest and most economical way to apply the material, but it can be messy. Workers should be careful to use protective equipment such as a face mask and rubber gloves.
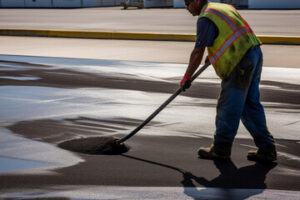
After the sealer has been mixed, workers can begin applying it to the pavement. The material is sprayed on the surface of the pavement, and then spread around with brushes and squeegees to make sure it adheres properly. Workers should also pay close attention to the edges of your pavement so that they don’t miss any areas.
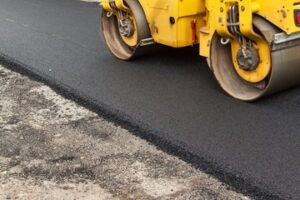
When properly applied, the sealer forms a protective barrier against UV rays and other oxidizing agents. This helps to slow down the deterioration of your asphalt, and it can restore its original color and sheen. It also prevents water from seeping into the foundation of your pavement and causing cracks that are costly to repair.
Regularly sealcoating your pavement is one of the best ways to preserve it and extend its lifespan. Whether you’re a homeowner looking to improve the appearance of your home or a business owner interested in increasing your property’s value, sealcoating is an excellent investment. With proper preparation, it’s easy to achieve a smooth, attractive finish that will last for years to come. The cost of this important service can easily be offset by the savings you’ll make in costly paving repairs down the road.
Spraying
Sealcoating is a process that can protect your asphalt investment. It helps to prevent damage from harsh weather elements like rain and UV rays that can cause cracks and potholes. It also boosts the aesthetic of your asphalt surface, making it look like new. If you’re considering a seal coating project, then it is important to understand the proper preparation and application process in order to achieve a successful outcome.
The first step is to block off the designated area of your asphalt surface. It’s a good idea to use traffic cones and sawhorses to keep people out of the area while you prep it. You will also want to place a sign or tape around any areas that you don’t want the black sealer to get on. This includes sidewalks, curbs, lampposts, fire hydrants, and garage doors.
It’s also a good idea to remove any debris from the area that you are planning on working on. This can be done with outside tools, including air blowers and brooms, along with a weed eater for the harder to reach spots in any present cracks. You will also want to make sure that the entire area is free of oil and gas spills as well, as these can degrade the asphalt over time.
Once the area is blocked off, you can begin to prepare the sealcoat itself. You will need to choose the right type of asphalt sealer for your pavement. There are many different types, but you should always look for a quality product that is designed specifically for your pavement material. It should also be a blend of liquid asphalt binder, such as coal tar or bitumen, along with sand and other fine particles.
Before you start the spraying process, you will need to clean your spray gun. You can do this by placing the tip in a Tupperware filled with Goof Off, bug & tar remover, or water. If you don’t clean your spray gun often enough, it will build up and become clogged, which can slow down the process.
Spreading
Sealcoating is a liquid application that, when applied to manufacturers’ specifications, creates a durable protective layer that shields asphalt surfaces from water penetration, oil spillage, UV rays, oxidation, and other damage. This is important because it prevents the degrading of asphalt pavement surfaces, which can lead to a loss of flexibility and strength, ultimately resulting in expensive repairs or replacements.
Before sealing, professionals perform a thorough inspection of the asphalt surface and address any cracks or other damage with specialized products. Then, the area to be sealed is carefully prepped, which includes blowing or sweeping away debris, dirt, and other materials that might impede the adhesion of the sealcoat. This process also involves removing any existing potholes and filling them with new asphalt patching material.
Once the preparation phase is complete, workers can begin to apply the actual sealcoat to the asphalt surface. This may be done using a sprayer, a squeegee, or a power-broom, depending on the size of the surface. Professionals are experienced in the techniques and equipment necessary for proper application, so uniform coverage is always guaranteed.
The color of the sealcoat is typically black, but this can change slightly based on weather conditions and other factors. During the drying process, it is possible for the sealcoat to experience temporary graying. This is usually caused by shaded areas, cooler temperatures, high humidity, and other environmental conditions that can slow down the sealcoat’s natural curing process.
During the mixing and spreading processes, it is important for workers to wear protective clothing and eyewear. This is because the chemicals used in sealcoating are noxious and can be dangerous if they come into contact with the skin or eyes. This is why a sheet of plywood is placed on the ground to create a stable work surface and protect workers from the vapors that are released during this step of the process.
After the sealcoat is spread, it must sit undisturbed for 24 to 48 hours. During this time, traffic must be restricted to avoid damaging the fresh coating. With proper maintenance and regular resealing, a well-applied sealcoat can protect your asphalt investment for years to come.
Drying
Sealcoating protects your asphalt surface from degrading substances that can soften and weaken it. It also makes it look new, and fills in small cracks and holes. However, in order for it to do this, the paved surface must be completely dry before sealcoating. If not, the process will not adhere to the surface and will eventually wash away or be eroded. Fortunately, there are some things you can do to ensure that the surface is dry and ready for sealcoating.
The first thing you should do is check the weather forecast for the day. The ideal weather conditions for a smooth, even and durable sealcoat are sunny, warm, and non-rainy. If you are unable to get the weather you want, you should pick another day to sealcoat your driveway or parking lot.
Humidity also plays a crucial role in the drying and curing process. When the moisture content of the air is high, it takes longer for the water in the sealcoat to evaporate. For optimal drying, humidity levels should be below 60 percent.
During the sealing process, workers need to remove all debris from the surface of the pavement. This includes dirt, oil and fuel spills, rocks, grass, stems, and other organic material. They also need to remove raised markers such as paint and cones used for traffic control, parking spaces, or directional arrows. In addition, they need to clean the surface of the pavement, using air blowers and brooms for large areas and small-bristle brushes for hard to reach areas such as around curbs or in existing cracks.
While the sealcoat is drying, you should block off the area of your driveway or parking lot. The process is messy, and you do not want to have anyone walking or driving on the surface until it dries properly. In addition, the materials used in a coal-tar sealant contain carcinogenic chemicals that can be dangerous to pedestrians or workers who come into contact with them.
Once the sealcoat is dry, you can remove the barricades and allow people to return to your property. However, you should leave the parking lot blocked off for a few hours to give the sealcoat time to fully set.